The Ultimate Guide to Using Postman Effectively
APIs power nearly everything we use today—mobile apps, websites, payment gateways, social platforms, and even smart devices.
But how do we ensure our APIs are returning accurate data while performing efficiently?
That’s where Postman comes in. Most developers have used Postman to design, test, and debug APIs. However, nearly 90% of them stop at simply sending a request and checking the response. What many don’t realize is that Postman’s capabilities go far beyond basic testing. When used effectively, it becomes an incredibly powerful tool for building reliable and high-performing APIs.
Send API requests and get response data in Postman
Whether you’re building or testing your own API, or integrating with a third-party API, you can send requests in Postman to connect to APIs you’re working with. Your requests can retrieve, add, or delete data, and can send parameters and authorization details.
For example, if you’re building a client application (such as a mobile or web app) for a store, you might send one request to retrieve the list of available products, another request to create a new order (including the selected product details), and yet another request to log a customer in to their account.
When you send a request, Postman displays the response received.
Sending Different API requests in Postman
HTTP
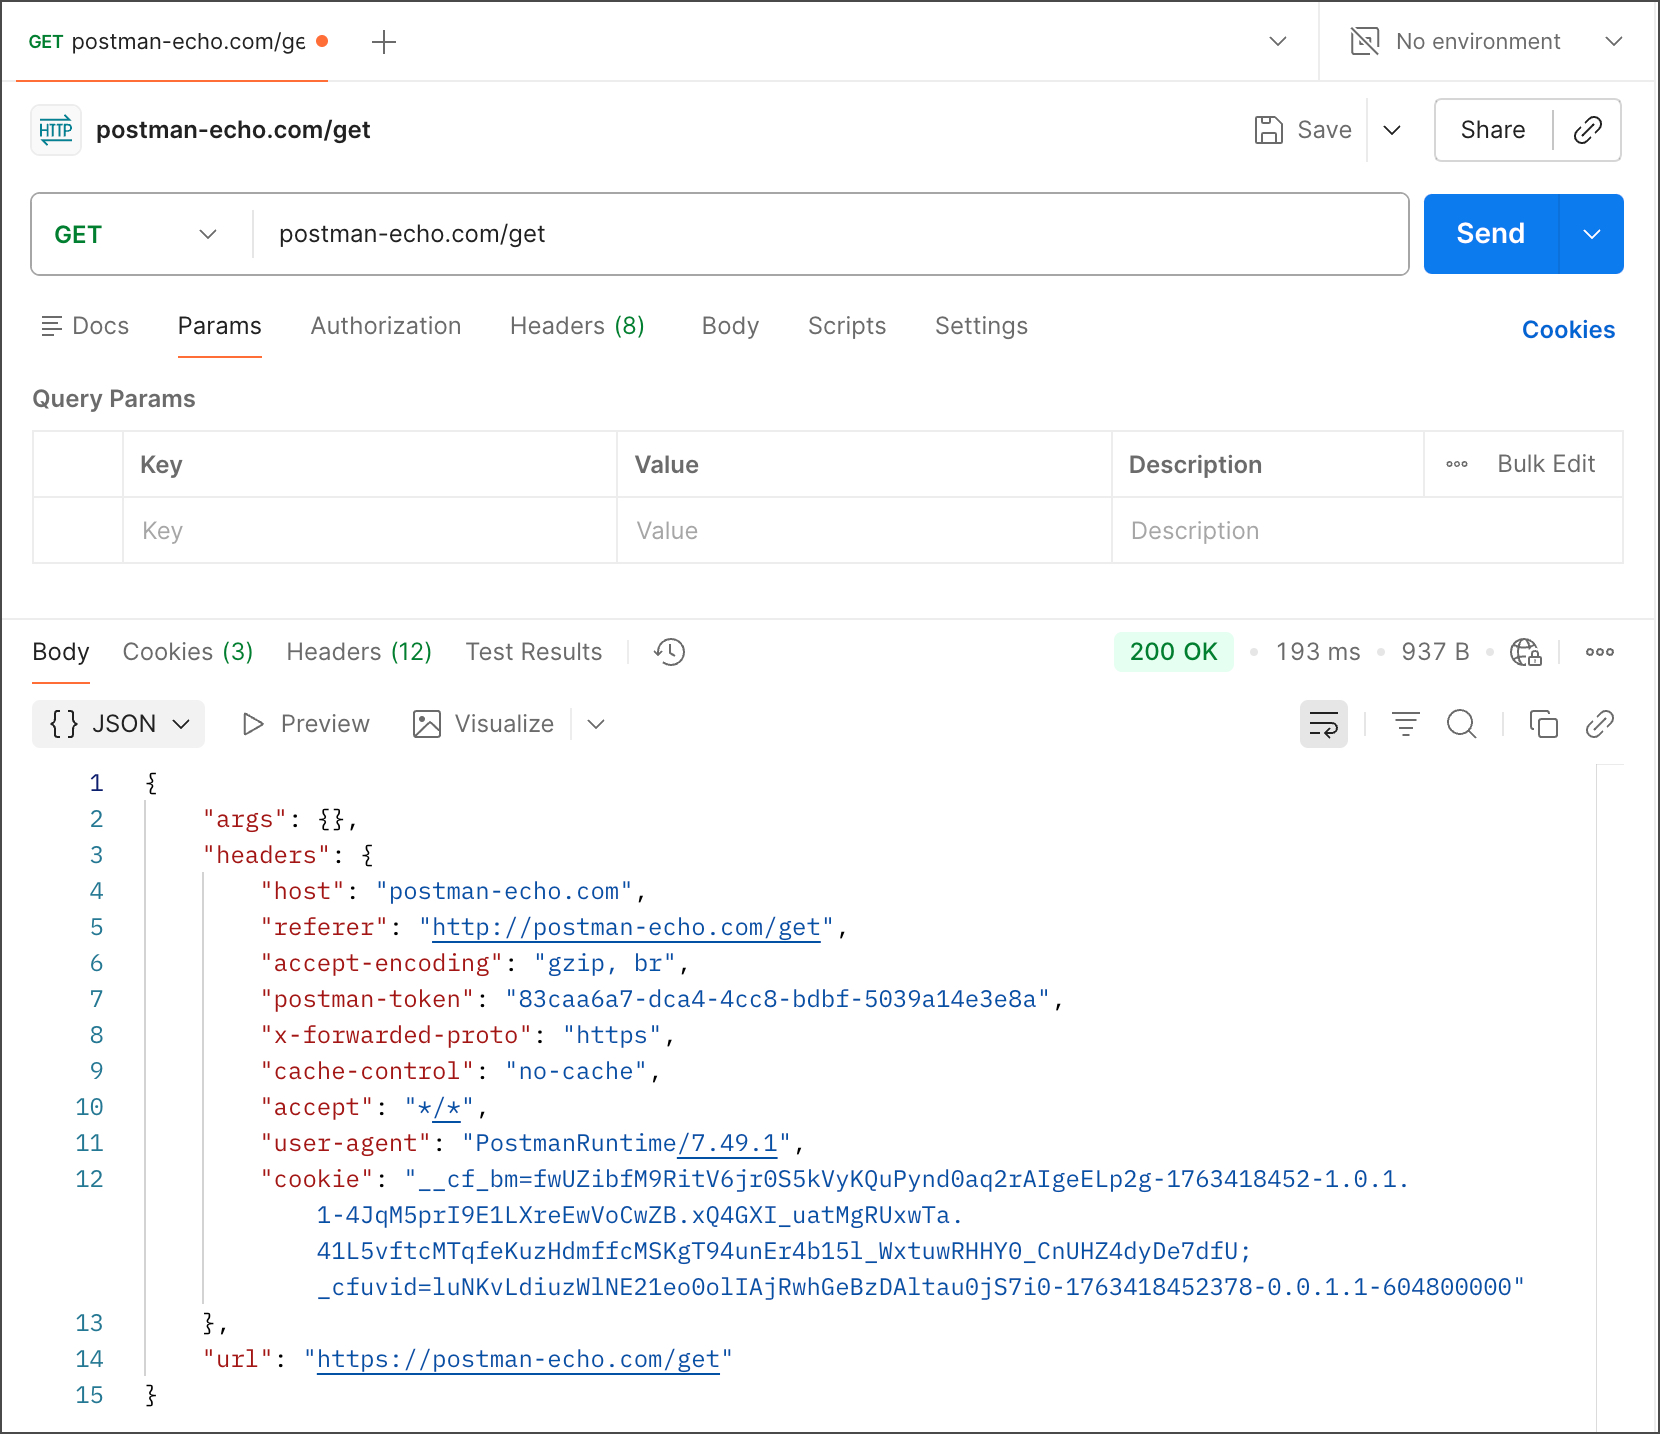
Make sure you’ve downloaded and installed the Postman desktop app. When you’re ready, open the Postman desktop app and send your first API request.
Click + Add in the workbench to open a new tab.
Enter “postman-echo.com/get” for the request URL.
Click Send.
Postman displays the response data sent from the server in the lower pane.
GraphQL
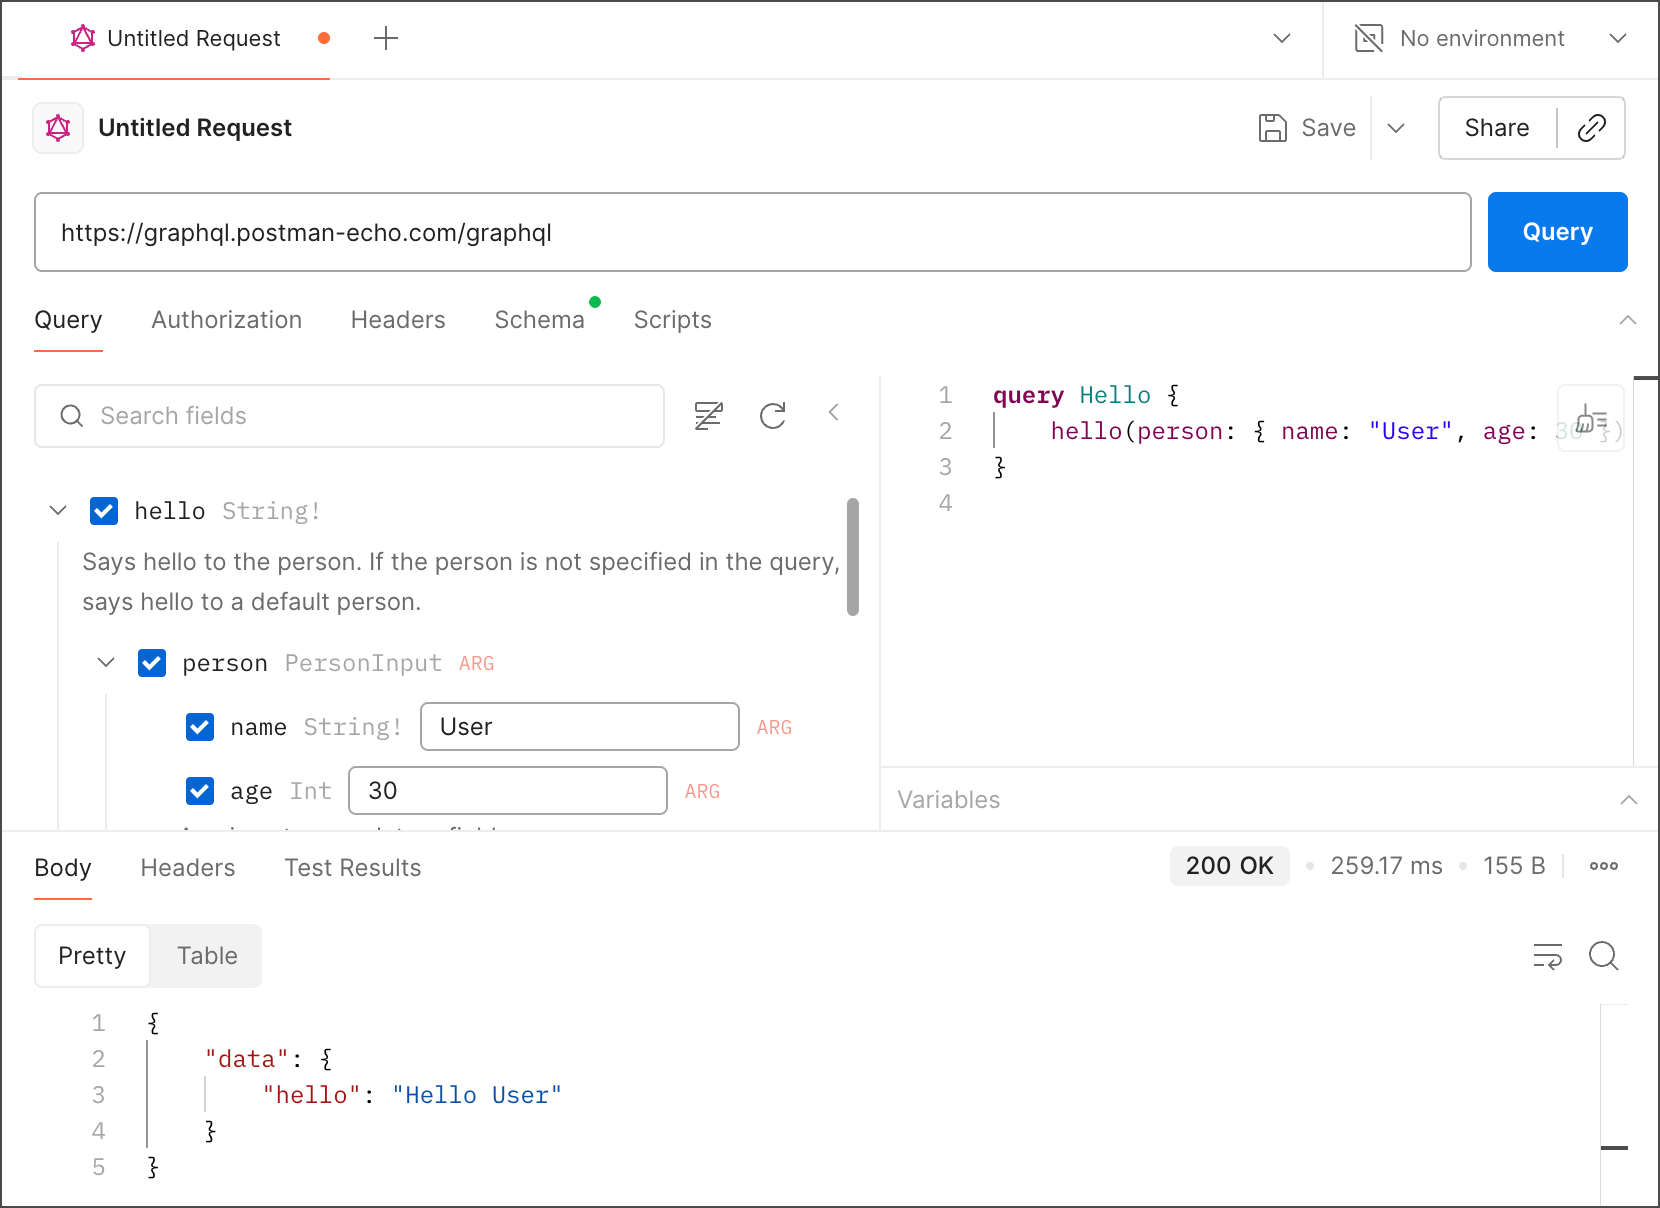
To send a GraphQL request in Postman, you need to set the request method to POST, enter the GraphQL API endpoint, and structure the query in the body of the request.
Here are the step-by-step instructions:
Set the request method: Change the HTTP method dropdown to
POST.Enter the endpoint: In the URL field, enter the GraphQL server's endpoint URL (e.g.,
api.github.com).Configure the body:
Go to the Body tab below the URL field.
Select the
GraphQLoption. This option automatically sets the correct headers and helps you structure your request properly.In the text area, enter your GraphQL query, including any operations and variables.
Example GraphQL Query Structure
Here is an example of what you would put in the body text area using the GraphQL option:
query GetUserData($username: String!) {
  user(login: $username) {
    name
    bio
  }
}
And below that, in the GraphQL Variables section (which appears once you select the "GraphQL" body type), you would enter your variables as a JSON object:
{
  "username": "octocat"
}
gRPC
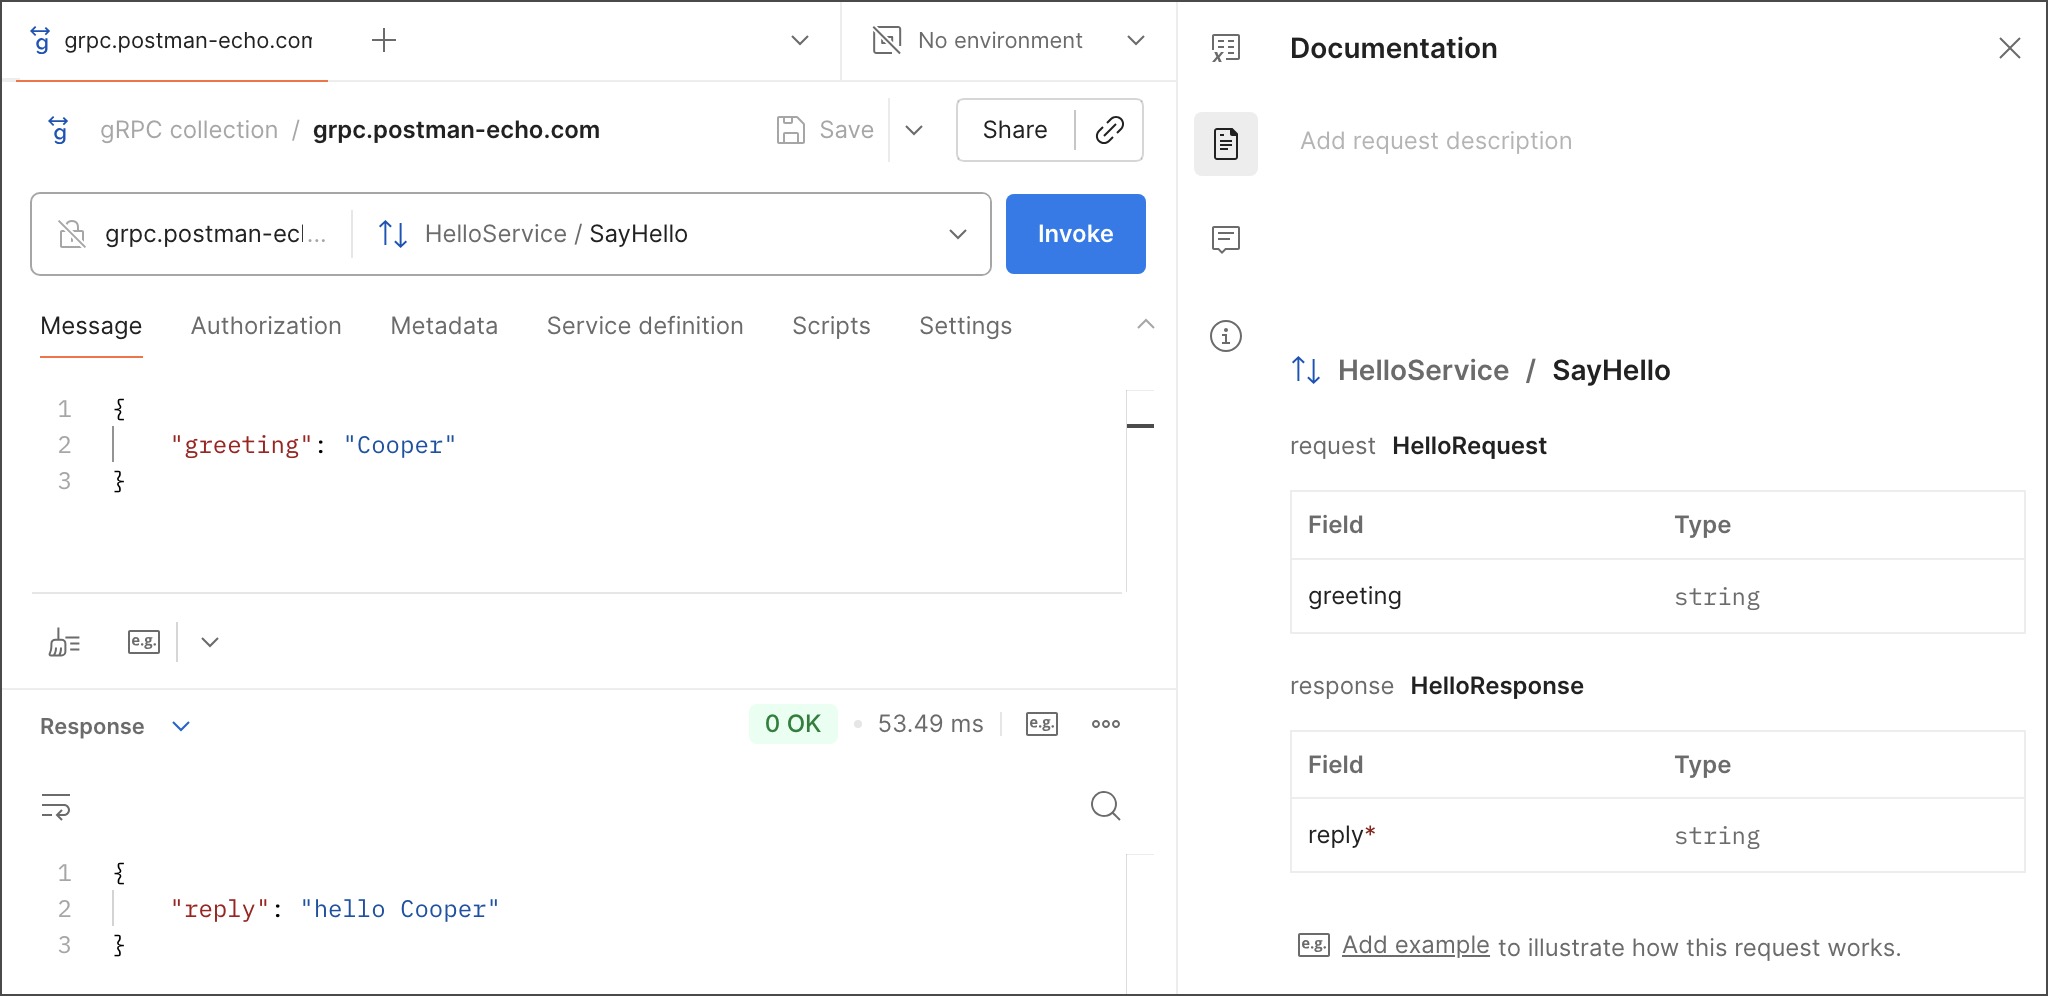
Sending a gRPC request in Postman is a straightforward process that involves creating a new gRPC request, providing the server URL and service definition, composing your message, and invoking the request.
Step-by-Step Guide
Open a New gRPC Request:
In a Postman workspace, click the + New button in the left-hand sidebar (or near the tabs area).
Select gRPC from the list of request types to open a new gRPC request tab.
Enter the Server URL:
- In the URL input field, enter the address of your gRPC server (e.g.,
grpc.postman-echo.comfor testing, orlocalhost:50051for a local server). Postman automatically handles thegrpc://protocol.
- In the URL input field, enter the address of your gRPC server (e.g.,
Define the Service and Method:
Postman needs the service definition (schema) to understand the available services and methods.
Using Server Reflection (Recommended): If your server supports gRPC server reflection, Postman will automatically detect and load the service definition after you enter the URL.
Manually Import a
.protofile: If the server does not support reflection, click on the Service definition tab (or the "Select a method" dropdown) and select the option to Import a .proto file to upload the definition from your local system.Once the definition is loaded, use the Select a method dropdown list to choose the specific gRPC method you want to invoke (e.g.,
SayHellofor a unary method).
Compose the Request Message:
Navigate to the Message tab. Postman uses a JSON interface for you to input data, which it internally converts to the binary proto format.
Click the Generate Example Message link to automatically populate the message with placeholder data based on the schema.
Edit the JSON message to include the actual values you want to send in your request (e.g., change the sample string to your name).
Configure Additional Details (Optional):
- If necessary, you can add Metadata (key-value pairs for information about the call, like authentication tokens) or configure Authorization details in the respective tabs.
Invoke the Request:
Click the Invoke button to send the request to the gRPC server.
The server's response will appear in the response area at the bottom of the screen.
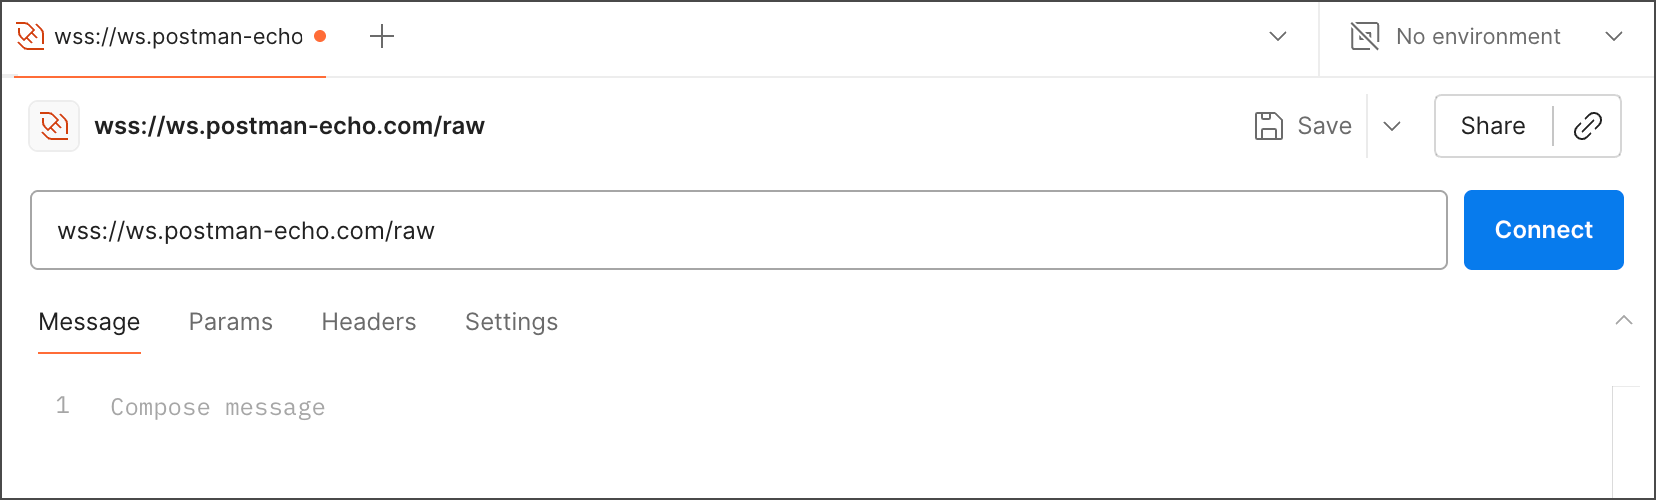
WebSocket
To send a WebSocket request in Postman, you first need to access the "New" menu to open a new WebSocket request tab .
Step-by-Step Guide:
Open Postman: Launch the Postman application.
Create a New Request: Click the New button located in the top-left corner of the Postman interface .
Select WebSocket: In the "New" menu, hover over Other and select WebSocket from the options .
Enter the URL: A new tab for a WebSocket request will open. Enter your WebSocket server's URL in the address bar (it should start with
ws://orwss://) .Connect: Click the Connect button . You should see the connection status change to "Connected" or a similar confirmation in the status area, and the server responses will appear in the message pane below .
Send Messages:
In the Message input area (under the Messages tab), type the data you want to send to the server.
Click Send to transmit the message . The message and the server's response will be logged in the conversation history pane .
Disconnect: When you are finished, click the Disconnect button to close the connection .
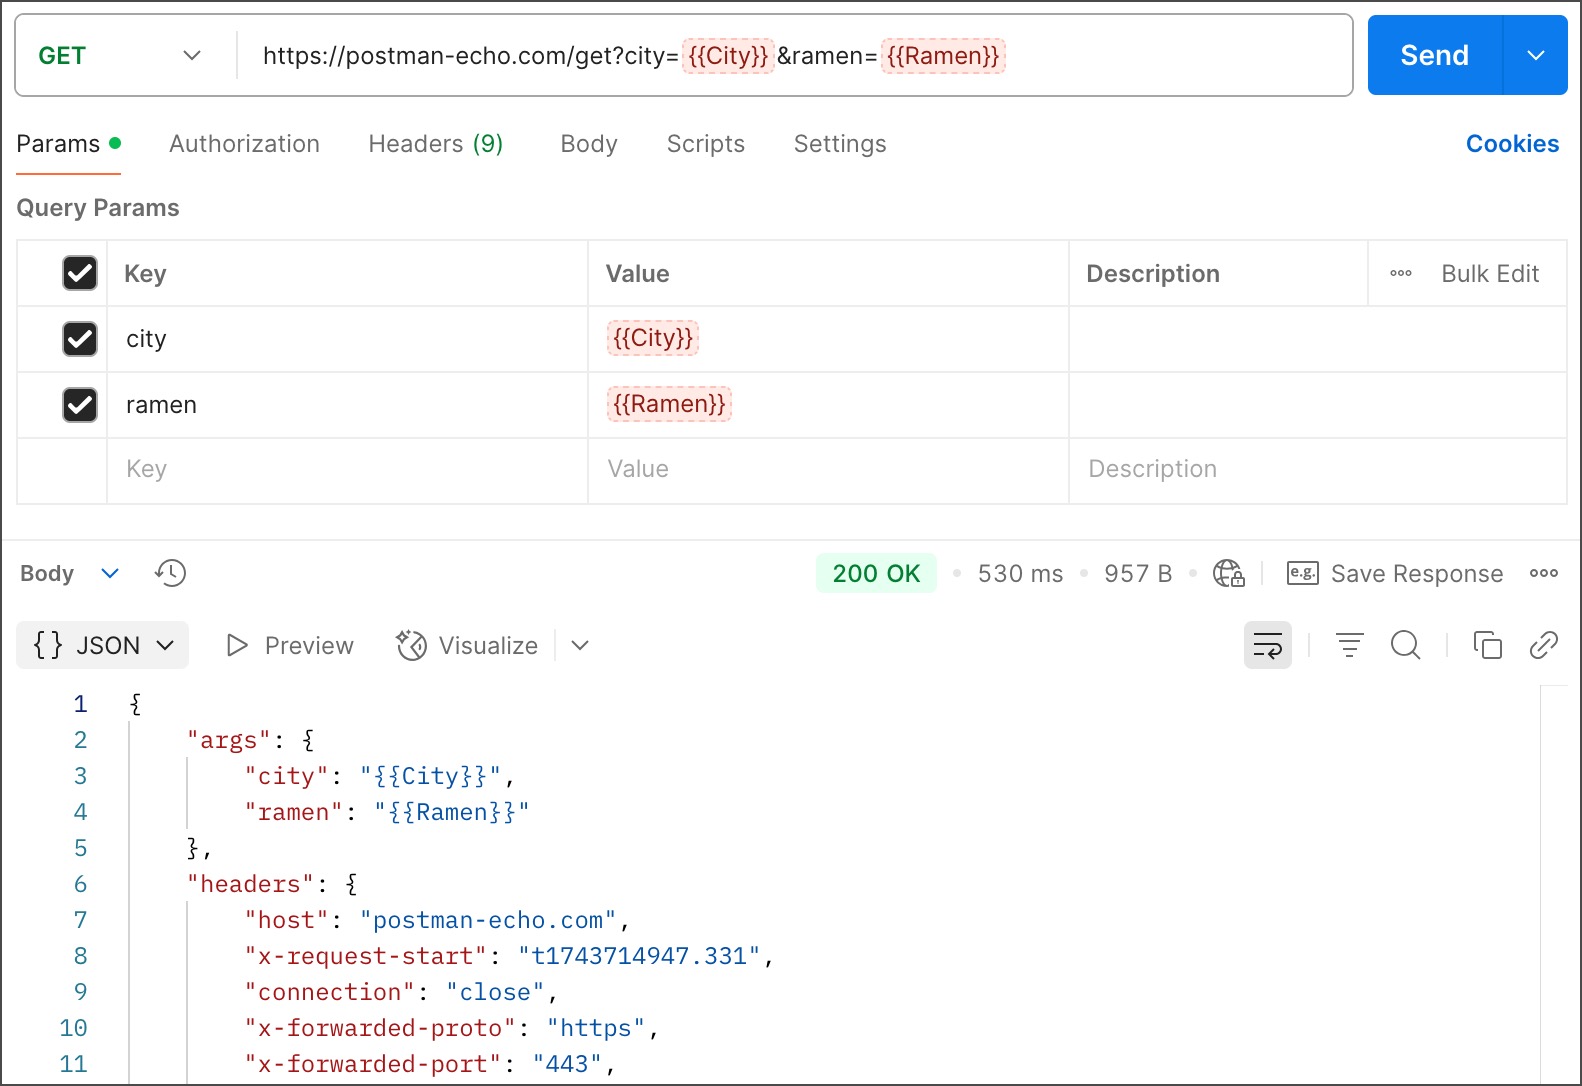
Creating variables in Postman
Often, we work with the same base URLs—such as a local environment (https://localhost:5000), a staging environment (https://staging.abc.com), or a production environment (https://abc.com). Instead of repeatedly typing these URLs, we can store them in variables and reuse them across requests. Postman also allows us to define the scope of these variables, so we can choose whether they apply only to a specific collection or are available globally across all requests.
Step 1: First select the URL and right click on it. You will get many options along with “set as variable” option. Click on that option.

Step 2: After clicking on “set as variable” option you will get the option to set the variable name (that will define the url) and the slope of the variable (collection refers to a particular folder of requests, global means the variable will be accessible in any request or collection, vault helps you to secure sensitive information like password, api-keys etc)

Params Tab
Here you can add query parameters associated in the API. You can just check or uncheck the params according to requirement. There is no need to manually add and remove the params from the api every time to check how responses change in different scenarios. You can also change the value of the query param.
For example, if my query parameter is named as “lang” which denotes the language of the respnse, and available values are en (for English) and hi ( for Hindi) we can change the values of the parameter but not the key i.e. the name of the parameter.

Authorization Tab
Postman enables you to send auth details with your API requests. APIs use authentication and authorization to ensure that client requests access data securely. Authentication involves verifying the identity of the request sender, while authorization confirms that the sender has permission to carry out the endpoint’s operation.
If you’re building an API, you can choose from a variety of auth models. If you’re integrating with a third-party API, the required authorization will be specified by the API provider.
Select an Authorization Type
When you select an auth type from the Auth Type dropdown list, Postman indicates which parts of the request your details are included in. For example, the header, body, URL, or query parameters. Postman then adds your auth details to the relevant parts of the request when you select or enter them. This enables you to preview how Postman will send your data before you run the request.

Authorization types supported by Postman
Postman supports several types of authorization. Select a type from the Auth Type dropdown list on the Authorization tab of a request. You can choose an authorization type on requests, collections, or folders.
No auth
Postman won’t send authorization details with a request unless you specify an auth type. If your request doesn’t require authorization, select the Authorization tab, then select No Auth from the Auth Type dropdown list.
API key
With API key auth, you send a key-value pair to the API either in the request headers or query parameters. In the request Authorization tab, select API Key from the Auth Type list. Enter your key name and value, and select either Header or Query Params from the Add to dropdown list. You can store your values in variables for extra security.
Postman appends the relevant information to your request Headers or the URL query string.
Bearer token
Bearer tokens enable requests to authenticate using an access key, such as a JSON Web Token (JWT). The token is a cryptic string, included in the request header. In the request Authorization tab, select Bearer Token from the Auth Type dropdown list. In the Token field, enter your bearer token value. For added security, store it in a variable and reference the variable by name.
Postman appends the token value to the text Bearer in the required format to the request Authorization header as follows:
CopyBearer <Your API key>
JWT bearer
JWT, which stands for JSON Web Token, is an open standard for securely sharing JSON data between parties. The data is encoded and digitally signed, which ensures its authenticity. JWT is widely used in API authentication and authorization workflows, as well as for data transfer between clients and servers.
Basic auth
Basic authentication involves sending a verified username and password with your request. In the request Authorization tab, select Basic Auth from the Auth Type dropdown list.
Enter your API username and password in the Username and Password fields. For extra security, store these in variables.
In the request Headers, the Authorization header passes the API a Base64 encoded string representing your username and password values, appended to the text Basic as follows:
CopyBasic <Base64 encoded username and password>
Headers Tab
The Headers tab in Postman is a key part of the request builder interface where you provide metadata about the API operation you are performing. These headers are essentially key-value pairs that contain extra information for the server, such as authentication credentials, content type, and caching instructions.
Key Functions and Features
Manual and Automatic Headers: You can manually add custom headers in the "Headers" tab using key-value fields. Postman also automatically generates common headers (like
Content-Typefor certain body types) and you can choose to override these auto-generated values if needed.Authentication: Headers are critical for authentication. Information configured in the "Authorization" tab, such as Bearer tokens or API keys, is often automatically translated into the relevant "Authorization" header.
Content Negotiation: The
Content-Typeheader tells the server what type of data you're sending (e.g.,application/json), while theAcceptheader tells the server what type of data you can process in the response.Visibility: By default, some auto-generated headers might be hidden. You can reveal all headers by selecting the "hidden" link in the Headers tab.
Variables: You can use variables (environment, collection, or global) within your header values for increased security and reusability across different environments or requests.
Header Presets: For commonly used groups of headers, you can save them as a "header preset" to quickly apply them to different requests.
How to Add Headers in Postman
Open a Request: Launch Postman and open an existing request or create a new one.
Navigate to the Headers Tab: Click on the Headers tab located just below the URL input field.
Add Key-Value Pairs: In the key-value editor, enter the header name in the Key field and its corresponding value in the Value field. Postman provides autocomplete suggestions for common headers.
Send the Request: Once you’ve added all necessary headers, click the Send button to make the API call.

Script Tab
The Scripts tab in Postman allows you to add custom JavaScript code that runs either before a request is sent or after a response is received. This functionality is crucial for automating API workflows, validating data, and creating dynamic requests.
Functionality
The Scripts tab contains two main sub-tabs for HTTP requests:
Pre-request script: Code in this tab executes before the request is sent to the API. Common uses include setting variable values (e.g., authentication tokens, dynamic data), parameters, headers, or body data dynamically.
Post-response script: Code here runs after Postman receives the response from the API. This tab is primarily used for writing tests and assertions to validate the response data (e.g., status codes, response body structure, headers, response time).

Run order of scripts
In Postman, the script run order for a single request looks like this:
A pre-request script associated with a request runs before the request is sent.
A post-response script associated with a request runs after the request is sent.

For every request in a collection, scripts run in the following order:
A pre-request script associated with a collection runs prior to every request in the collection.
A pre-request script associated with a folder runs prior to every direct child request in the folder.
A post-response script associated with a collection runs after every request in the collection.
A post-response script associated with a folder runs after every direct child request in the folder.

For every request in a collection, the scripts always runs according to the same hierarchy. Collection-level scripts run first, then folder-level scripts, and then request-level scripts. This run order applies to both pre-request and post-response scripts.
For example, the following collection is structured with a single folder and two requests within the folder.

If you created log statements in the pre-request and post-response script sections for the collection, folder, and requests, the run order is returned in the Postman Console.

How to generate mock data for testing APIs
Generating mock data for API testing in Postman can be achieved through a few methods, primarily using built-in features like Mock Servers, dynamic variables, and custom scripts .
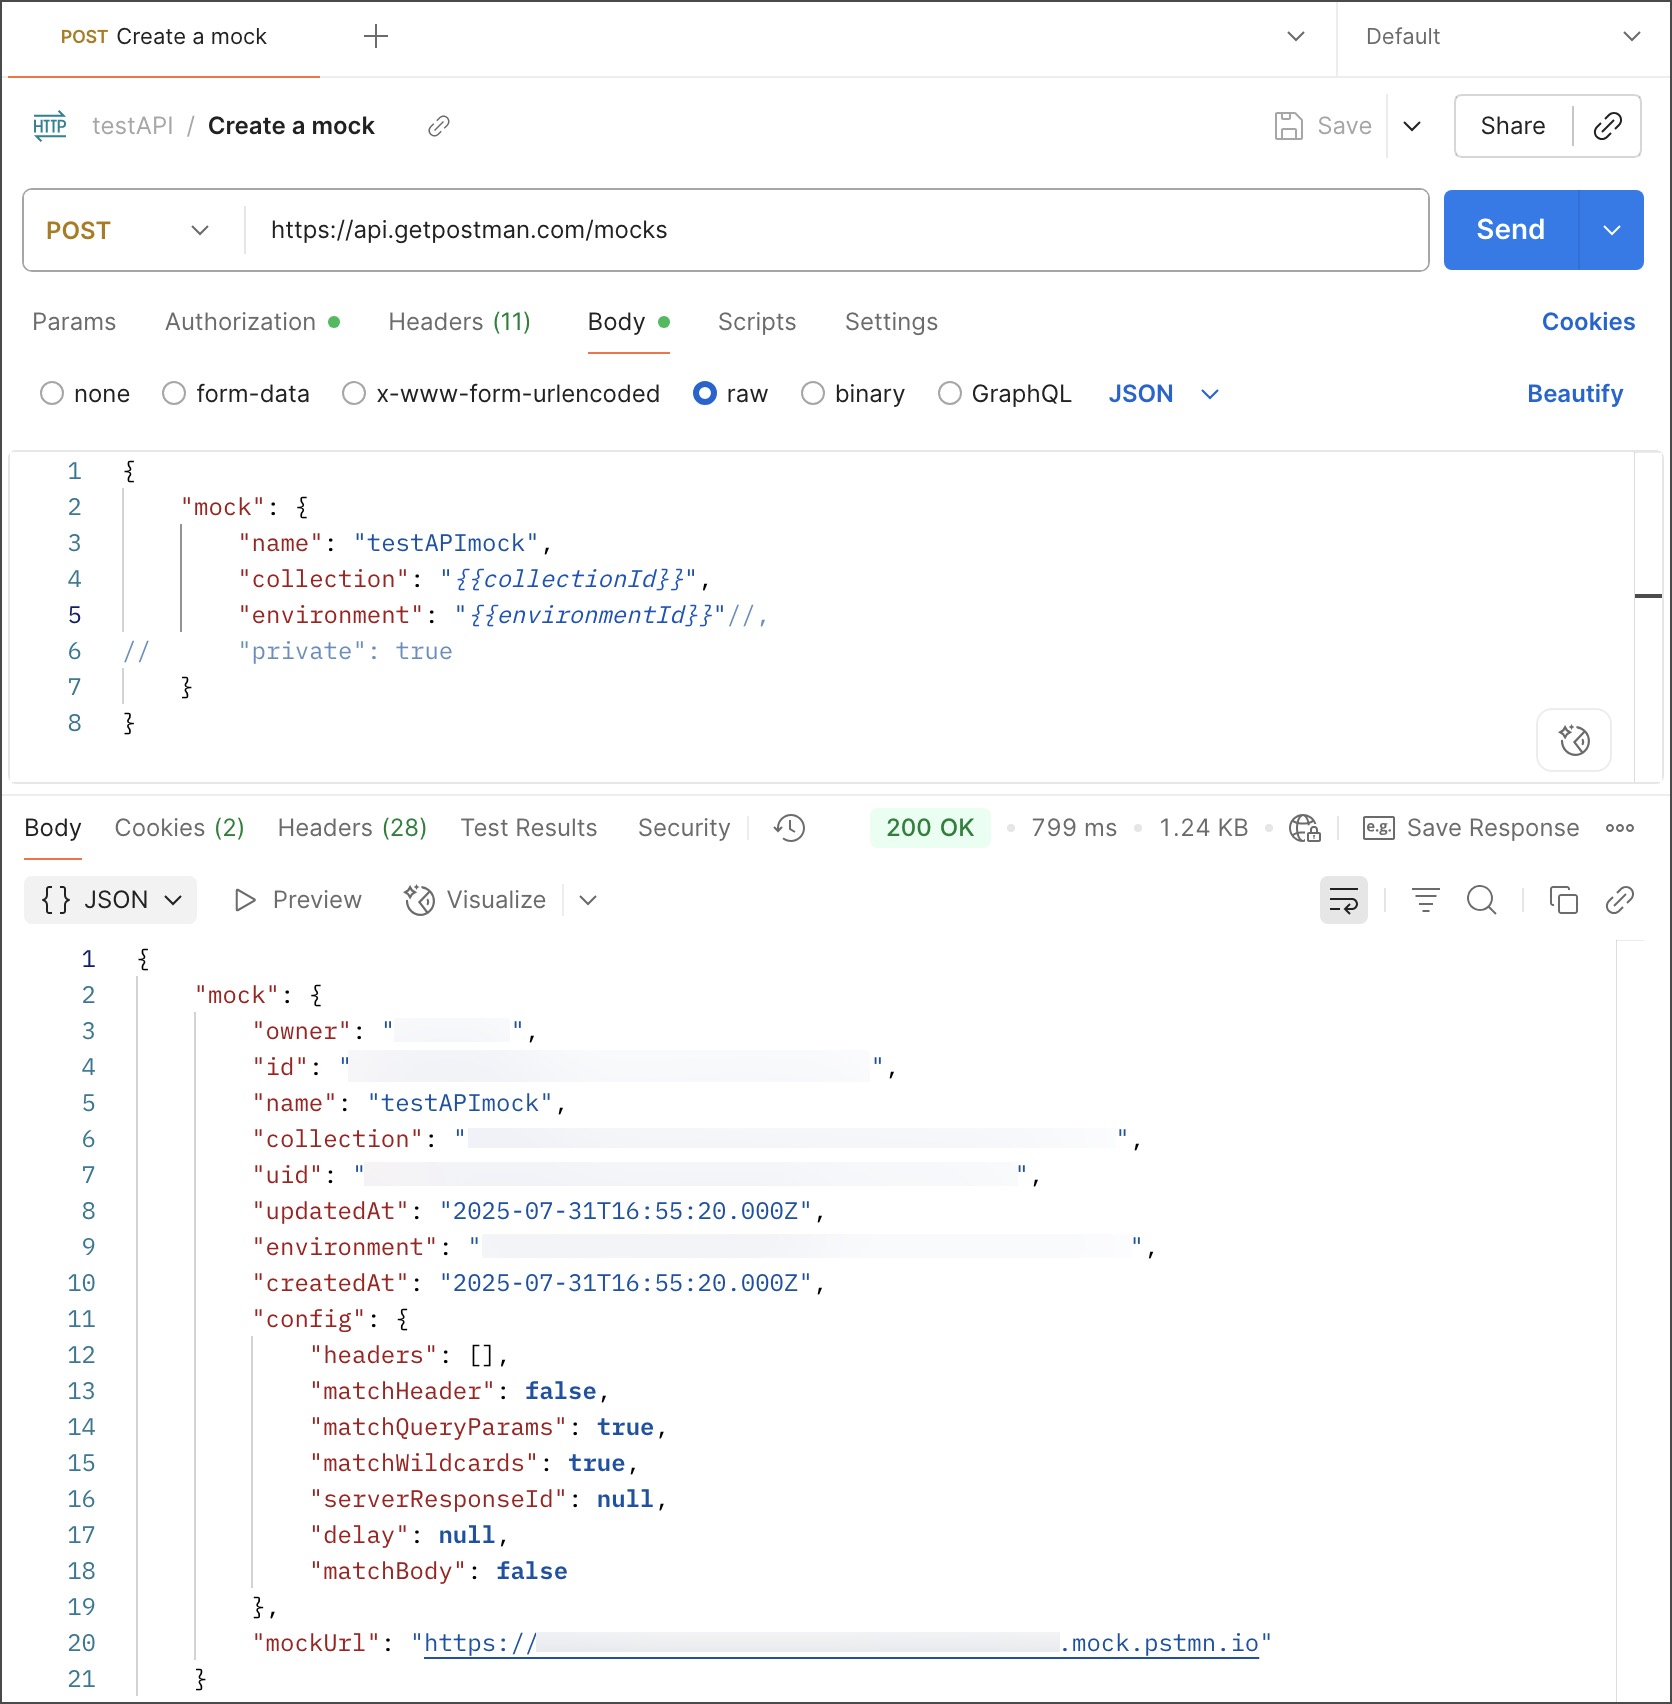
1. Using Postman Mock Servers
The most common method is using Postman's mock servers, which simulate API endpoints and return predefined or dynamically generated responses.
Create a Mock Server:
In Postman, click New > Mock Server.
Define the request method (GET, POST, etc.) and the endpoint path (e.g.,
/users).Define the response body that the mock server should return. You can use dynamic variables here (see step 2).
Give your mock server a name and configure settings like environment selection.
Click Create Mock Server. Postman provides a mock URL you can use in your tests.
2. Utilizing Dynamic Variables
Postman provides built-in dynamic variables that generate random data each time a request is sent. This is excellent for creating unique mock data on the fly within request bodies or responses [1].
You can use these variables in the pre-request script or directly in the request body/mock response body:
{{$guid}}: Generates a UUID (e.g.,f47ac10b-58cc-4372-a567-0e02b2c3d476){{$randomInt}}: Generates a random integer (e.g.,123){{$randomBankAccount}}: Generates a random bank account number{{$randomFirstName}},{{$randomLastName}}: Generates random names{{$randomEmail}}: Generates a random email address{{$randomCountry}}: Generates a random country name
3. Leveraging the Faker Library in Pre-request Scripts
For more complex or specific data generation needs, Postman's sandbox allows you to use a subset of the popular Faker.js library within your pre-request scripts [1].
Open the Pre-request tab of your request.
Use
pm.globals.set()orpm.variables.set()to store the generated data in a variable, which you can then reference in your request body.Example Script:
 // Generate a random product name and price using the Faker library
 const productName = faker.commerce.productName();
 const price = faker.commerce.price();

 // Set these as collection variables (or environment/global variables)
 pm.collectionVariables.set("mock_product_name", productName);
 pm.collectionVariables.set("mock_price", price);
You would then reference these variables in your request body like this:
{
  "name": "{{mock_product_name}}",
  "price": "{{mock_price}}"
}
How to customize test cases for APIs
To create an API test case in Postman, you first build your request (URL, method, headers, body) and then add test scripts using JavaScript in the "Scripts" > "Post-response" tab. These scripts contain assertions to validate the response data against your expected outcomes.
Step 1: Set up the API Request
Create a new request in a collection for better organization.
Specify the HTTP method (e.g.,
GET,POST,PUT,DELETE).Enter the API endpoint URL.
Add necessary details in the relevant tabs:
Params: For query parameters.
Authorization: For authentication methods (API keys, OAuth, etc.).
Headers: For required headers like
Content-Type: application/json.Body: For
POSTorPUTrequests, enter the data payload, typically in raw JSON format.
Click "Send" to get a response and verify the request works manually before adding tests.
Step 2: Write the Test Scripts
Go to the "Scripts" > "Post-response" tab of your request.
Use the "Snippets" menu on the right to quickly add common test scripts.
Write JavaScript code using the pm.test() function to define specific tests. This function takes a test name (string) and a function containing assertions. The
pm.expect()orpm.response()methods are used for assertions, relying on the Chai.js BDD library.
Common Test Examples
- Check for a specific status code (e.g., 200 OK)
pm.test("Status code is 200", function () {
    pm.response.to.have.status(200);
});
- Check if the response body is valid JSON and has specific properties:
pm.test("Response has expected properties", function () {
    const responseJson = pm.response.json();
    pm.expect(responseJson.type).to.eql('vip');
    pm.expect(responseJson.name).to.be.a('string');
});
- Check response time is within a certain limit:
pm.test("Response time is less than 200ms", function () {
    pm.expect(pm.response.responseTime).to.be.below(200);
});
- Verify a response header exists:
pm.test("Content-Type header is present", function () {
    pm.response.to.have.header("Content-Type");
});
Step 3: Run the Test Case
After adding the test script, click "Send" again.
View the results in the "Test Results" tab in the response pane at the bottom. This tab will indicate how many tests passed or failed.

Conclusion
Postman is more than just a tool to hit an API and see what comes back. Once you start using features like variables, environments, collections, and tests, it becomes a real game-changer for your API workflow. These small improvements can save time, reduce errors, and make working across different environments much smoother.
Taking a little extra time to explore Postman’s full potential can go a long way in building more reliable and efficient APIs—without adding extra complexity to your day-to-day work.